Right at this very moment I have this in the oven. I feel like such a phoney.
It's... it's... (I can barely bring myself to admit this...) from a box. [GASP!] Not only that, but the pineapples are from a can (the cats twined around my legs upon hearing that sound, despite the rarity of them actually getting tuna fish), the cake is covered with imported coconut, and the unnaturally red cherries sweetened with HFCS are from a jar.
At least the eggs are from our own hens.
Why would I make such a thing? One of my coworkers got a new job in another department and tomorrow we're having a going away potluck for her. I offered to make her favorite dessert, thinking it would be a chocolate something-or-other that I could make lovingly from scratch with local ingredients (save the chocolate).
Wrong. She picked the kitschy-ist, impossible-to-make-local dessert that I could imagine!
I started looking for recipes, which piqued my curiousity and led me to the history of upside down cakes. I found out that Nigella Lawson loves pineapple upside down cake. I unearthed a hoity toity recipe over at epicurious.com. I found out that the fruit-festooned upside down cakes were originally made in cast iron skillets and probably originated in the Middle Ages.
Knowing that I'd be making said cake on a Sunday night and that I tend to exhaust myself over weekends with projects, I decided to go old school and just make it from a box.
It's a good thing I did, too. On Saturday I sat around and knitted all day while watching Seasons 3 & 4 of 30 Rock. It was raining and we really couldn't do anything outside. I am working on an afghan for my dad for Christmas and have about 20 hours of work left. I may finish this week!
Today was a beautiful fall day, a relative rarity for a weekend. After going to meet Lisa to pick up a 5.5-pound pork belly I went back home, pulled out the ladder and loppers, and trimmed the massive lilac so that it's no longer touching the house and power lines.
While I was out there I trimmed the apple tree. I saved some branches for some applewood-smoked bacon I'm going to make with the pork belly.
Then I raked the chicken run and put down some lime to curb the poo odors.
Then I raked the dirt off the concrete walkway that's been covered by dirt by our 9 feathered excavators.
Then I cleared the yard of the dog and chicken poop I could find.
Then I swept up the dozens of chicken feathers that the newly molting Dozer is dropping everywhere. It's like she's leaking feathers.
Then I went to my 92-year-old grandma's house to take her dinner, visit for a bit, and do a general check-in.
Then we came home to hand out candy to trick-or-treaters. (An aside: holy shiznit, what's the deal with the slutty costumes for girls who can't be older than 15? And a note to the boys: wearing a mask with your normal clothes does not a costume make.)
Whew. That was a good call making that cake from a box but I'm still feeling rather sheepish about it.
Sunday, October 31, 2010
Friday, October 22, 2010
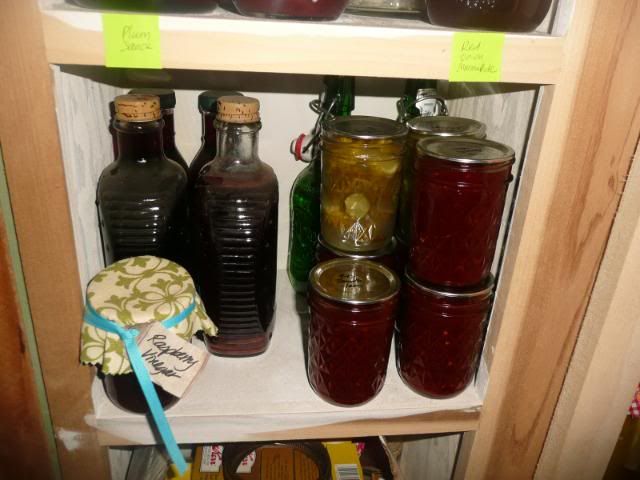
Well preserved
Even though I've declared the canning season over, I'm still preserving various foods.
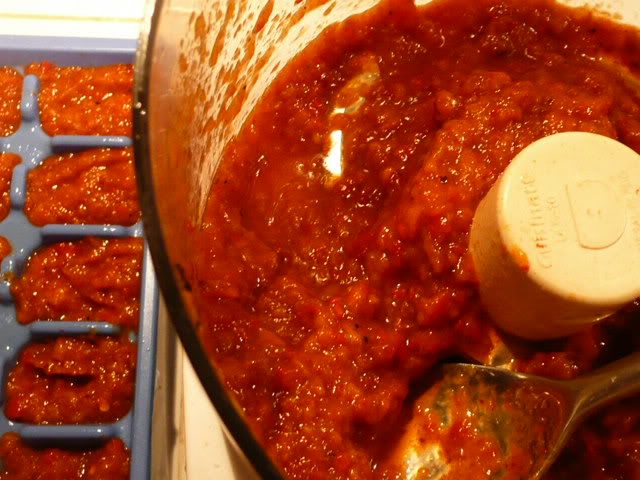
Local bell peppers were dirt cheap a couple of weeks ago. The farmers market had them 3/$1. I bought them like crazy, then getting home with my bounty... and scratching my head about what to do with them.
After hanging onto them for longer than was probably reasonable, I decided to fire-roast them, whir them in the food processor, and freeze in ice cube trays.
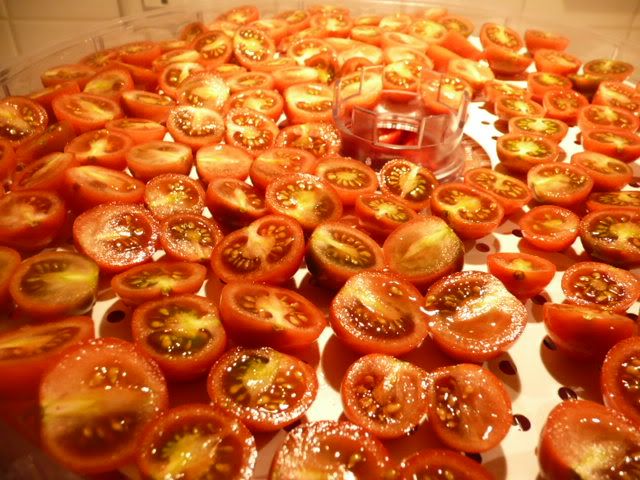
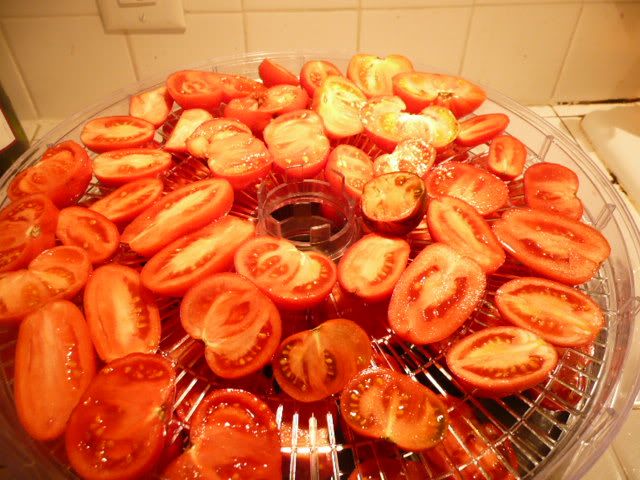
The big box of tomatoes became just 2 pint jars of shriveled burgundy chips. They're slated for many of the same uses as the bell peppers. I dried them to a pretty tough state to avoid problems of spoilage due to moisture. Some went into olive oil and the rest are just in jars. Hubbie picked up a tub of dried tomatoes and wryly said, "this jar is really expensive".
Such a romantic, that man.
Local bell peppers were dirt cheap a couple of weeks ago. The farmers market had them 3/$1. I bought them like crazy, then getting home with my bounty... and scratching my head about what to do with them.
After hanging onto them for longer than was probably reasonable, I decided to fire-roast them, whir them in the food processor, and freeze in ice cube trays.
This winter I'll use these cubes of deliciousness in pasta sauce, pizza, breads, and soups. Yum!
I also recently got a dehydrator over the summer. It was $15 on craigslist in a nearby city called Buckley. Unfortunately, there's no easy way to get there from here without going through stripmall hell. I hadn't been there in years, so what the heck did I know? It wound up being a pretty - and pretty long - drive on a late summer evening.
These little black cherry tomatoes were picked as little green orbs and ripened in a box on the floor of the dining room. I didn't get a single ripe tomato straight from the yard. Every single one was ripened in the house.
Same with these tomatoes.
The big box of tomatoes became just 2 pint jars of shriveled burgundy chips. They're slated for many of the same uses as the bell peppers. I dried them to a pretty tough state to avoid problems of spoilage due to moisture. Some went into olive oil and the rest are just in jars. Hubbie picked up a tub of dried tomatoes and wryly said, "this jar is really expensive".
Such a romantic, that man.
Thursday, October 21, 2010
Happy birthday, dad
Today is my dad's 63rd birthday.
He doesn't read my blog, so I can tell you what I got for him.
Last weekend I was driving to Seattle to visit friends and I heard an interview on NPR with a Seattle author who wrote a book called "Jet Age". I was fascinated by the conversation about the global impact of the Boeing 707. My dad was a pilot in the Air Force and I thought he'd enjoy the book. When I got back home, I went straight to King's Books, a small independent bookstore, and ordered the book for Dad.

I looked up the book earlier this week on amazon.com and the book was about half the price. On one hand I want to get a refund and get it online instead. On the other hand, I want to support a local business (putting aside the fact that amazon.com is a Seattle company). The book is already paid for, so I guess the decision is made.
Oh well.
We're having a small party at my folks' house this weekend. I promised Dad I'd make vanilla ice cream. G-man is traveling - again - so it'll be just my folks, brother, and me. Oh, and Rosemary will go, too.
Now, if only I had room in the freezer for the ice cream freezing thingy.
Here's the recipe I'll try for Dad: http://www.foodnetwork.com/recipes/alton-brown/serious-vanilla-ice-cream-recipe/index.html. I've tried making egg custard ice cream in the past except there's a problem: our eggs are too eggy. I'll eschew eggs for now and make a sinful dessert of cream, cream, and more cream.
He doesn't read my blog, so I can tell you what I got for him.
Last weekend I was driving to Seattle to visit friends and I heard an interview on NPR with a Seattle author who wrote a book called "Jet Age". I was fascinated by the conversation about the global impact of the Boeing 707. My dad was a pilot in the Air Force and I thought he'd enjoy the book. When I got back home, I went straight to King's Books, a small independent bookstore, and ordered the book for Dad.
I looked up the book earlier this week on amazon.com and the book was about half the price. On one hand I want to get a refund and get it online instead. On the other hand, I want to support a local business (putting aside the fact that amazon.com is a Seattle company). The book is already paid for, so I guess the decision is made.
Oh well.
We're having a small party at my folks' house this weekend. I promised Dad I'd make vanilla ice cream. G-man is traveling - again - so it'll be just my folks, brother, and me. Oh, and Rosemary will go, too.
Now, if only I had room in the freezer for the ice cream freezing thingy.
Here's the recipe I'll try for Dad: http://www.foodnetwork.com/recipes/alton-brown/serious-vanilla-ice-cream-recipe/index.html. I've tried making egg custard ice cream in the past except there's a problem: our eggs are too eggy. I'll eschew eggs for now and make a sinful dessert of cream, cream, and more cream.
Tuesday, October 19, 2010
Loose ends - Deli dill pickles
I was raised in the Episcopal Church and generally thought that guilt was in the sole proprietorship of the Catholics. "Catholic Light" has all the same prayers, rituals, and hymns but none of that pesky guilt, right?
Wrong.
It's been weighing heavily on my mind that I haven't finished the deli dill pickles that I started waaaay back when. OK, technically I finished them, but I haven't posted the rest of the recipe.
Here goes:
After the cukes have finished fermenting - approximately 4-6 weeks - continue to stage 2.
1. Prepare canner, jars, and lids.
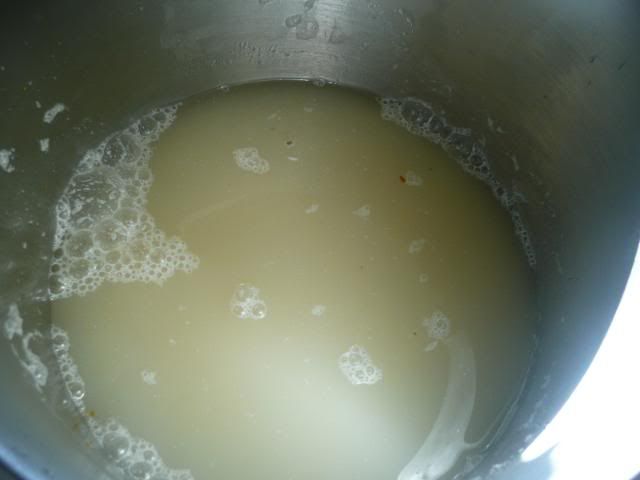
2. Drain pickles, reserving brine. Set pickles aside. Strain brine into a large stainless steel saucepan. Bring it to a boil over medium-high heat and boil gently for 5 minutes.
NOTE on straining - the brine will look milky and this is normal. The milkiness comes from the natural yeast in the brine. You could try straining it through coffee filters if this really bothers you.
3. Pack pickles into hot jars with a generous 1/2" headspace. Ladle hot pickling liquid to cover pickles and leave 1/2" headspace. If desired, add some hot peppers and/or garlic to the jars. Adjust level after removing any bubbles. Wipe rim, put on lid & ring.
4. Place jars in canner and process 15 minutes.
After being canned, the natural yeasts will settle to the bottom in a couple of weeks and look like a white layer of dust. This is totally harmless. I strained my brine through cloth but it didn't seem to reduce the milkiness much, if at all.
A few more notes:
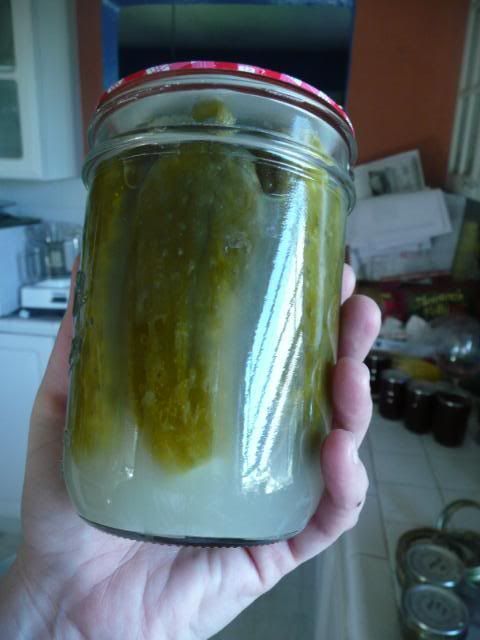
I canned nearly all of my dill pickles in pint jars because while hubbie and I like dill pickles, we have a tough time eating an entire quart of them before they get slimy.

I also did a couple of half-pints of sliced dill pickle chips. That's them on the top in the back here. They're great for sandwiches for those times we're just too lazy to slice up some pickles.
Wrong.
It's been weighing heavily on my mind that I haven't finished the deli dill pickles that I started waaaay back when. OK, technically I finished them, but I haven't posted the rest of the recipe.
Here goes:
After the cukes have finished fermenting - approximately 4-6 weeks - continue to stage 2.
1. Prepare canner, jars, and lids.
2. Drain pickles, reserving brine. Set pickles aside. Strain brine into a large stainless steel saucepan. Bring it to a boil over medium-high heat and boil gently for 5 minutes.
NOTE on straining - the brine will look milky and this is normal. The milkiness comes from the natural yeast in the brine. You could try straining it through coffee filters if this really bothers you.
3. Pack pickles into hot jars with a generous 1/2" headspace. Ladle hot pickling liquid to cover pickles and leave 1/2" headspace. If desired, add some hot peppers and/or garlic to the jars. Adjust level after removing any bubbles. Wipe rim, put on lid & ring.
4. Place jars in canner and process 15 minutes.
After being canned, the natural yeasts will settle to the bottom in a couple of weeks and look like a white layer of dust. This is totally harmless. I strained my brine through cloth but it didn't seem to reduce the milkiness much, if at all.
A few more notes:
I canned nearly all of my dill pickles in pint jars because while hubbie and I like dill pickles, we have a tough time eating an entire quart of them before they get slimy.
I also did a couple of half-pints of sliced dill pickle chips. That's them on the top in the back here. They're great for sandwiches for those times we're just too lazy to slice up some pickles.
Monday, October 18, 2010
Loose Ends - Sweet Pickles
A while back I posted the beginning of a recipe for Icicle Pickles. Time got away from me like a water wiggler and next thing I knew it was mid-October.
I offer my humble apologies... and the rest of the icicle (sweet) pickle recipe.
After the pickles have fermented for one week, you're going to have another 5 days of work to do. Plan out the schedule so that you end on a day when you'll have time to can.
These steps seem daunting but in all honesty, they take just a few minutes on any given day. Hang in there!
Start with stage 1 (Recipe from "Ball Complete Book of Home Preserving")
Stage 2
Drain the cukes and discard the brine. Rinse your crock. Rinse cukes in cold running water and drain thoroughly. Return to the rinsed crock. Cover cukes with boiling water, put a cover on the crock, and let stand in a cool place for 24 hours.
Stage 3
1. Drain cukes and discard liquid. Rinse crock. Return cukes to crock.
2. Tie 4.5 tsp picking spice in a square of cheese cloth or tea ball.
3. In a large, stainless saucepan, combine 5c sugar and 5c white vinegar. Bring to a boil, then pour over cukes.
4. Cover and let stand in a cool place for 24 hours.
Stage 4
Drain cukes, reserving liquid and spice bag. Rinse crock. Return cukes to the crock. Boil liquid and spices bag then pour over cukes. Cover and store 24 hours.
Stage 5
Repeat Stage 4 for 3 more days.
Stage 6
1. Prepare canning supplies.
2. Discard spice bag. Drain cukes, reserving liquid. Bring liquid to a boil in a large pot.
3. Pack cukes into hot jars within generous 1/2" headspace (I use rubber gloves to to this). Ladle hot liquid into jars. leaving 1/2" headspace. Remove air bubbles and adjust headspace if necessary. Wipe rim, center lid on jar, finger-tighten ring.
4. Process for 10 minutes.
I always jot down notes in the margins of my canning recipes. For these pickles I wrote:
"Made 2008. Complicated but very good!"
"2010. Let ferment [longer than a week] because I forgot. Still good!"
Another thing to consider for this recipe. I started it in a pot that was too small. Then moved to a cast-iron pot that rusted around the rim. I finally finished it in a stainless steel stock pot. Save yourself the work and pick a single pot to pickle in.
Saturday, October 16, 2010
The end of canning season
There are a few things that mark the end of canning season.
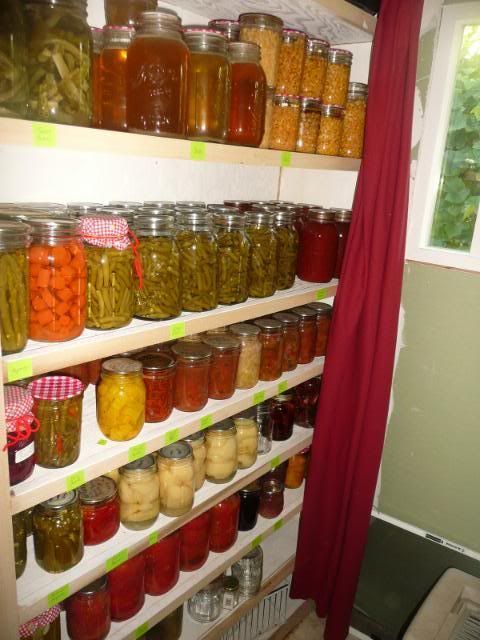
No, it's not the shelves filled with colorful jars.
It's not the falling leaves, the stench of foul political ads, nor a date on the calendar.
To me, the end of canning season is marked by 2 things.
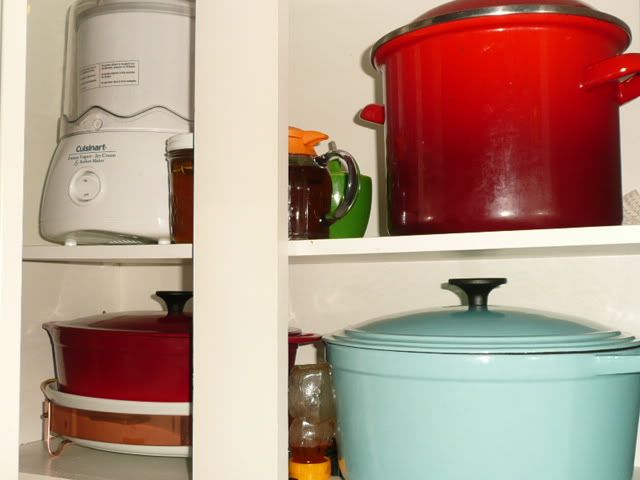
First, my pots are returned to their shelves and are no longer taking up space on my counter. These pots held pickles, sauerkraut, and an unintended fruit fly orgy.

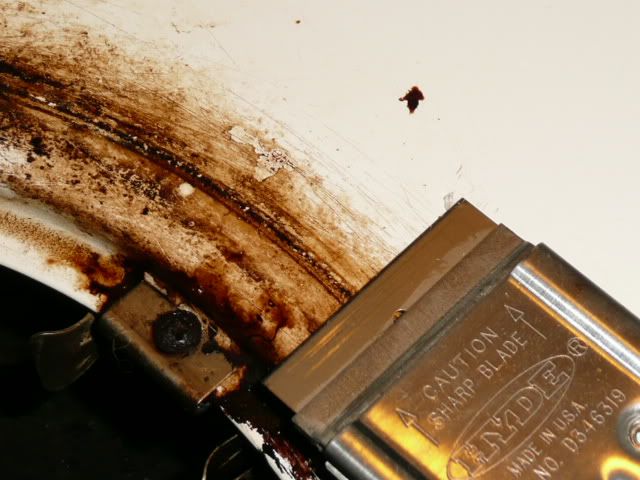
It's time to bring out the big guns. Karen from The Art of Doing Stuff calls it a "Thingamabob Razor Squeegee". I'm boring so I just call it a razor blade.
With elbow grease and then an abrasive cleaner with bleach, my stove now looks much better.
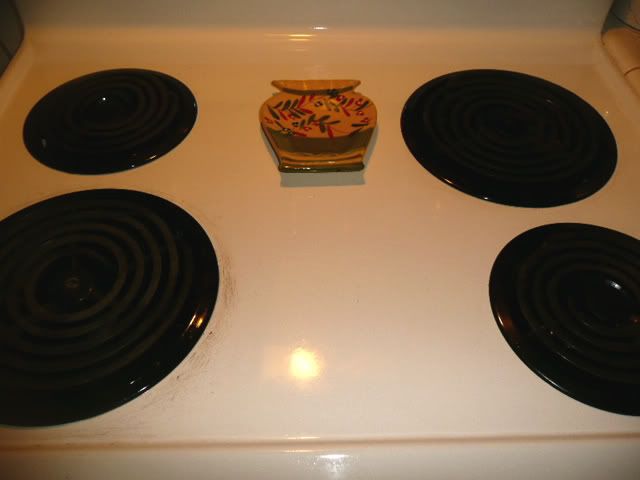
And with the clean stovetop emerging from the gunk like the Phoenix from the ashes, canning season is hereby declared over.
No, it's not the shelves filled with colorful jars.
It's not the falling leaves, the stench of foul political ads, nor a date on the calendar.
To me, the end of canning season is marked by 2 things.
First, my pots are returned to their shelves and are no longer taking up space on my counter. These pots held pickles, sauerkraut, and an unintended fruit fly orgy.
But no longer. The oval Le Creuset cocotte that I bought in France for $40 and lugged back, the red Le Creuset enameled stockpot I found for $16 on uber clearance in San Francisco on a business trip, and the Martha Stewart Le Creuset wannabe I got a year ago for $35 (also on super duper clearance), all are back in their respectful places.
I love clearance sales. And France.
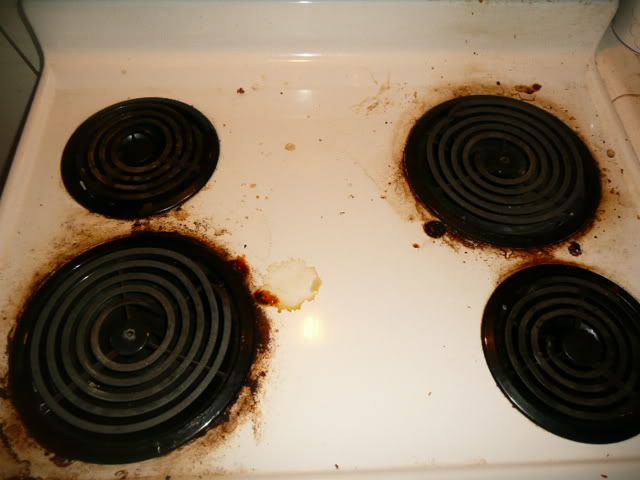
The second indicator that canning season has come to a close is this. My stove.
My disgusting, nasty, dirty, stuff-burned-on stove.
It takes a beating during the summer. I get to a point where I stop doing all but the cursory wipes because I know how dirty it will get by the fall. Why bother?
It gets pretty ugly.
I'm embarassed to show you.
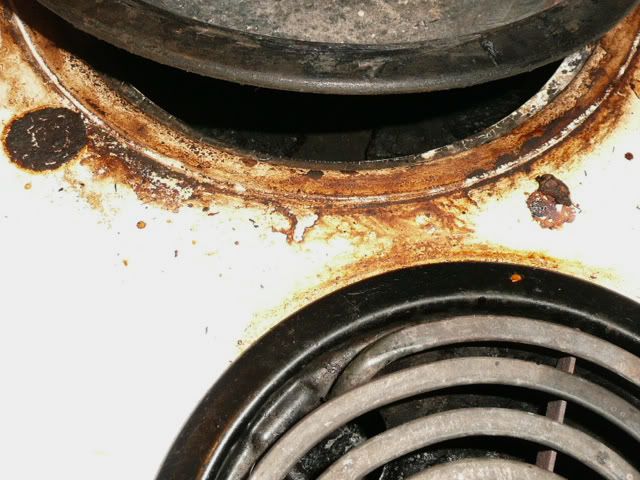
This is the stovetop after scrubbing with an abrasive sponge.
No amount of scrubbing or chemicals will ever get this clean.
It's time to bring out the big guns. Karen from The Art of Doing Stuff calls it a "
With elbow grease and then an abrasive cleaner with bleach, my stove now looks much better.
And with the clean stovetop emerging from the gunk like the Phoenix from the ashes, canning season is hereby declared over.
Friday, October 15, 2010
Fifth time's the charm
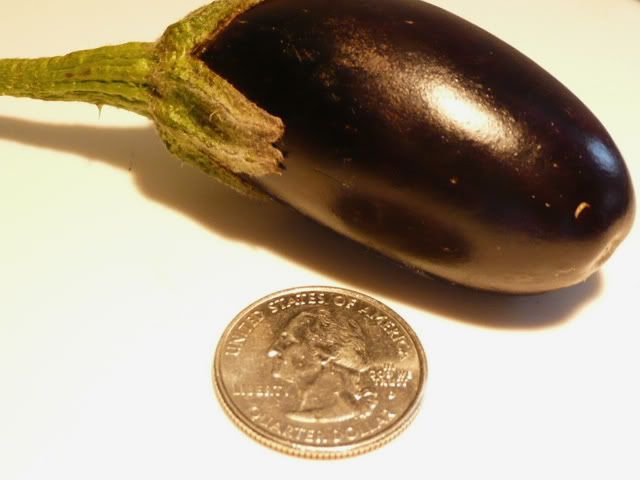
After 4 summers in a row of failed attempts, I have finally succeeded in cultivating eggplant. Behold the fruit of my parking strip:
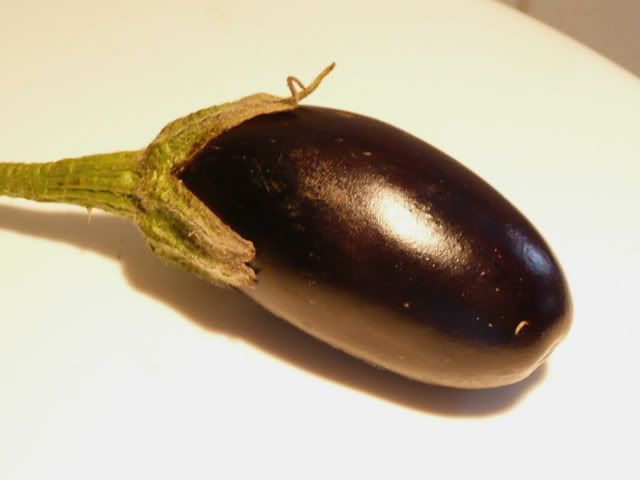
Isn't it pretty?? There are some slug nibbles but it's otherwise good. The flesh is smooth, deep purple, and feels heavy for its size. Perfect!
Nevermind.
Thursday, October 14, 2010
B-b-b-b-bad to the bone
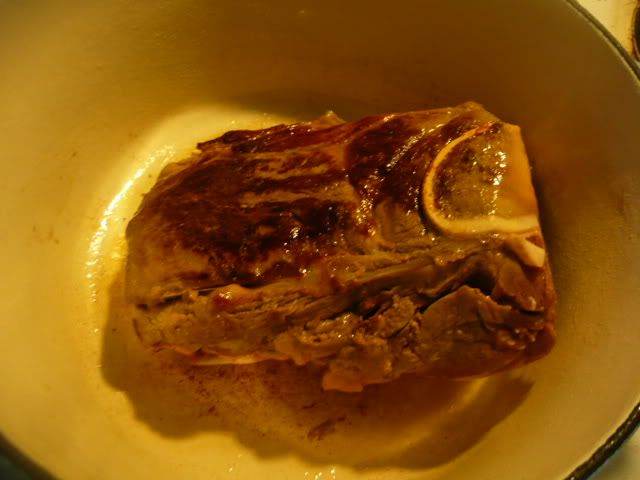
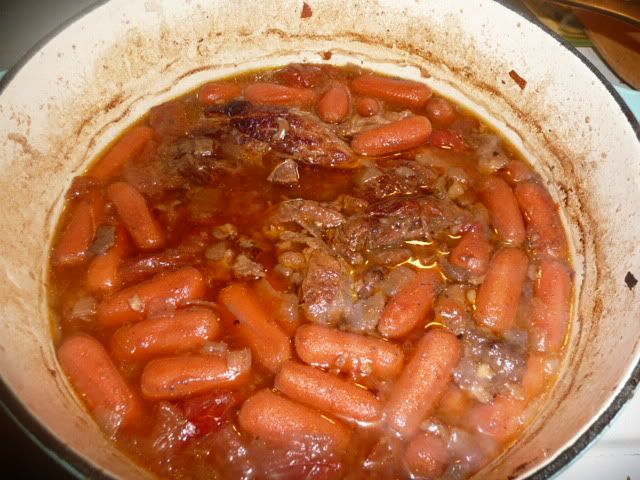
Last weekend I made a pretty rockin' pot braise/roast. As you can see, it had a sizeable bone in it, which I decided to give to Rosemary.
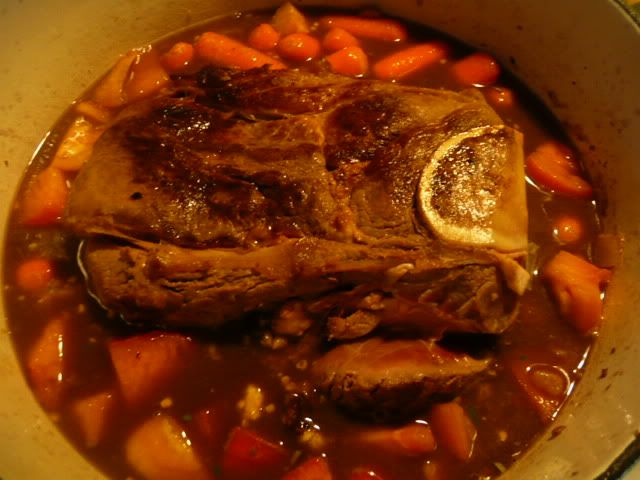
She was very happy and went into her crate with it.
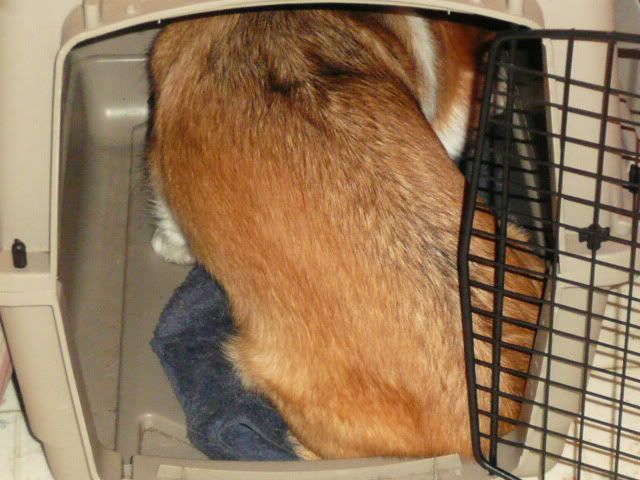
We didn't see much of her for the next 2 days. She brought it out with her at dinner time, then retreated back into her crate. We could hear her gnawing on it from the other end of the house. That was one happy pooch.
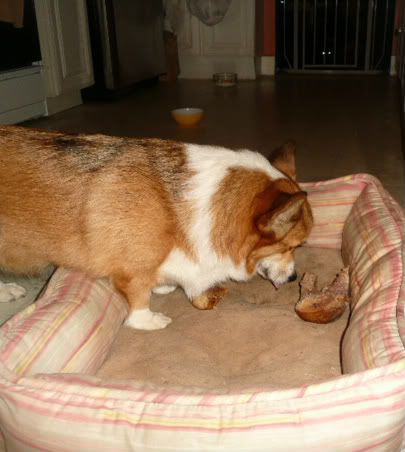
Unfortunately, Rosemary got too possessive of her bone and started to run off the cats, growling and barking. This is very out of character for her and it royally pissed off G-man.
Apparently bones are like crack for Rosemary. We're sending her to treatment and, sadly, had to take away her bone.

She was very happy and went into her crate with it.
We didn't see much of her for the next 2 days. She brought it out with her at dinner time, then retreated back into her crate. We could hear her gnawing on it from the other end of the house. That was one happy pooch.
Rosemary must share her domain with an ancient evil lurking, albeit behind a babygate, in the background.
Unfortunately, Rosemary got too possessive of her bone and started to run off the cats, growling and barking. This is very out of character for her and it royally pissed off G-man.
Apparently bones are like crack for Rosemary. We're sending her to treatment and, sadly, had to take away her bone.
It was good while it lasted.
Wednesday, October 13, 2010
Pot braise
A friend of mine at work and I were talking a while back about grass-fed beef. She told me that friends of hers had raised a head of cattle in their pasture and that she and her husband had bought some of the meat. It turned out that the friends hadn't really known how to raise cattle and the resulting meat was way too lean for my friend's tastes. So she offered it to me for the chickens.
Why not? Free meat for the girls.
After watching my girls go hog wild for the first piece I figured that I could cook up the second roast for us. If we didn't like it, the hens would not object to a bovine feast.
Unfortunately for them, the pot braise was simply too good to share. Sorry, ladies. No more cast-off meat for you!
If you find yourself with a tough or super-lean cut of beef, braising it will bring out its best qualities. Why? Cooking lesser or tough cuts of meat in a long, low heat allows the connective tissues to break down into yumminess. Here's a simple way to cook up that piece of tough, organic, grass-fed beef. Your house will smell divine and the leftovers will be even better.
Ingredients
A hunk of beef large enough to feed your crowd
Olive oil
1 onion, chopped
4 garlic cloves, minced
1/2 cup flour
1/2 bottle red wine
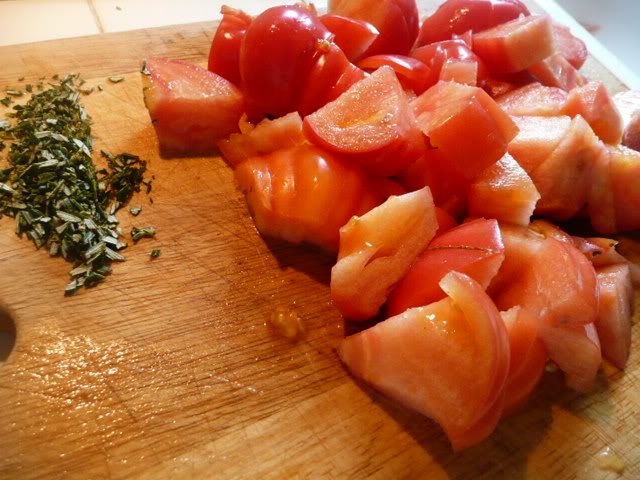
Twig of fresh rosemary, diced to yield ~3 tbsp, or 1 tbsp dried rosemary
1 quart beef broth
As many carrots as you feel like eating
Salt and pepper
Tomatoes: either get 1 can of plum tomatoes (with liquid) or rough-chop 2-3 fresh ones
Method
1. In an oven-proof pot, sear the beef over medium-high in some olive oil. You'll know the beef is ready to flip when it releases easily from the pan bottom. Remove from pan and set aside.
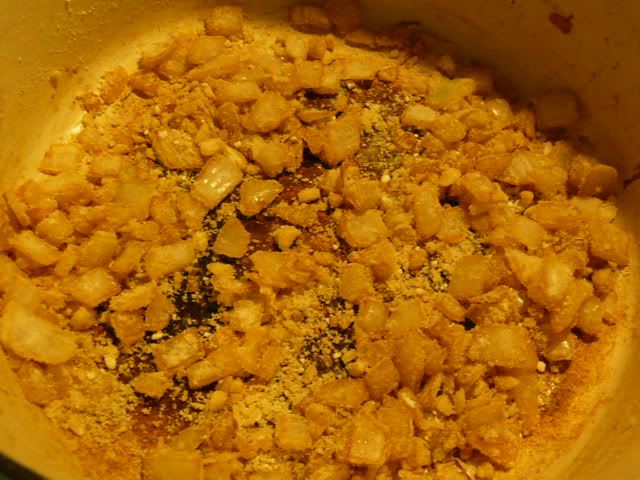
2. Add more olive oil, maybe 2 tbsp or so, and decrease the heat to medium-low. Add onions and cook until brown and translucent. Then add the garlic.
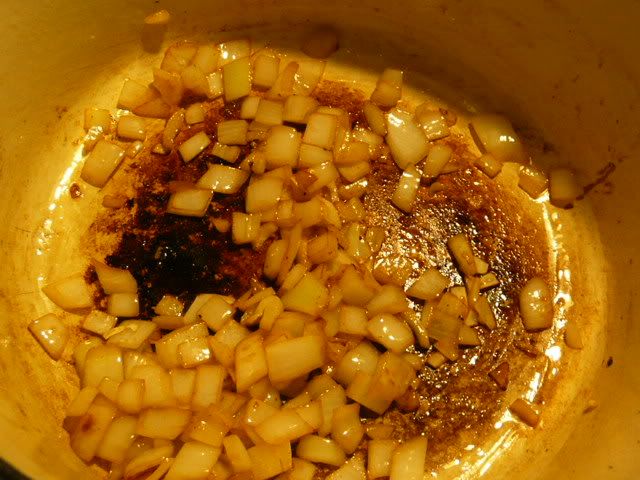
3. Throw in the flour. Stir it around until it coats the onions and starts to turn brown, too. It'll happen fairly quickly.
4. Now you get to deglaze the pan! See all the brown gunk on the bottom of the pan? When you add the wine - roughly a half bottle - you're going to lift up all those brown bits and they'll add flavor to the sauce. Because of the flour, the sauce will thicken as well.
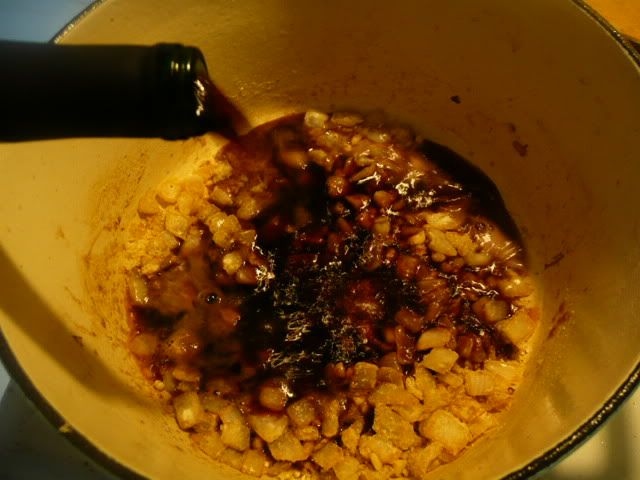
5. Stir well. But not too well. I got overzealous. Thank goodness this is not a good shirt. Once of these days I'll be better about wearing an apron. I'm so bad about that.

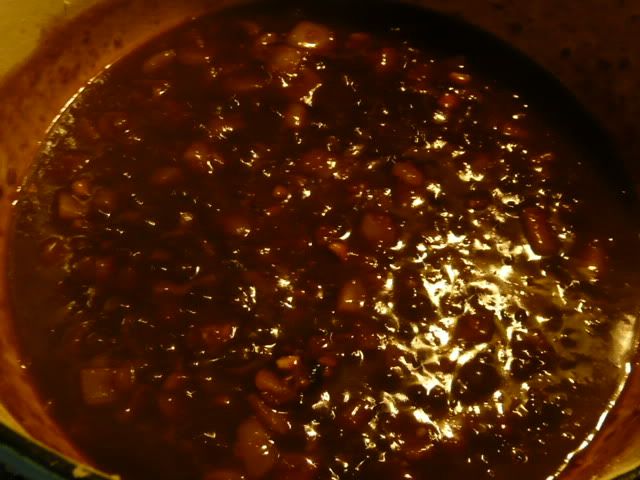
6. Once the wine is incorporated, add the broth. Then throw in the carrots, rosemary, tomatoes, salt and pepper, and put the beef back in.
7. Plop on the lid and put the whole thing into a 275-degree oven for the rest of the day. If you check the meat in 2-3 hours, you'll find that it's rock hard. Leave it for another 2-3 hours and those connective tissues will dissolve, leaving you a hunk of meat that falls off the bone and smells amazing.
Serve with mashed potatoes or a crusty bread.
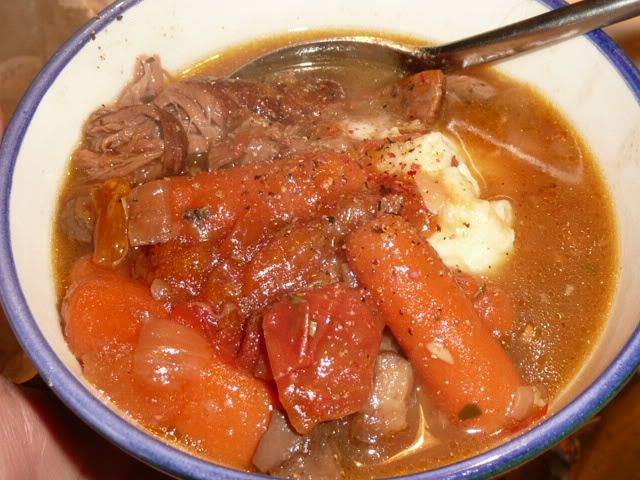
Optional serving method: cook with potatoes, mushrooms, and any other root vegetable you like. Parsnips would be divine.
This could also be transferred into a slow cooker at step 6. Cook it on low for a mid-week meal that's waiting for you when you return from a long day at work.
Why not? Free meat for the girls.
After watching my girls go hog wild for the first piece I figured that I could cook up the second roast for us. If we didn't like it, the hens would not object to a bovine feast.
Unfortunately for them, the pot braise was simply too good to share. Sorry, ladies. No more cast-off meat for you!
If you find yourself with a tough or super-lean cut of beef, braising it will bring out its best qualities. Why? Cooking lesser or tough cuts of meat in a long, low heat allows the connective tissues to break down into yumminess. Here's a simple way to cook up that piece of tough, organic, grass-fed beef. Your house will smell divine and the leftovers will be even better.
Ingredients
A hunk of beef large enough to feed your crowd
Olive oil
1 onion, chopped
4 garlic cloves, minced
1/2 cup flour
1/2 bottle red wine
Twig of fresh rosemary, diced to yield ~3 tbsp, or 1 tbsp dried rosemary
1 quart beef broth
As many carrots as you feel like eating
Salt and pepper
Tomatoes: either get 1 can of plum tomatoes (with liquid) or rough-chop 2-3 fresh ones
Method
1. In an oven-proof pot, sear the beef over medium-high in some olive oil. You'll know the beef is ready to flip when it releases easily from the pan bottom. Remove from pan and set aside.
2. Add more olive oil, maybe 2 tbsp or so, and decrease the heat to medium-low. Add onions and cook until brown and translucent. Then add the garlic.
3. Throw in the flour. Stir it around until it coats the onions and starts to turn brown, too. It'll happen fairly quickly.
4. Now you get to deglaze the pan! See all the brown gunk on the bottom of the pan? When you add the wine - roughly a half bottle - you're going to lift up all those brown bits and they'll add flavor to the sauce. Because of the flour, the sauce will thicken as well.
Be generous with the wine. It adds flavor.
7. Plop on the lid and put the whole thing into a 275-degree oven for the rest of the day. If you check the meat in 2-3 hours, you'll find that it's rock hard. Leave it for another 2-3 hours and those connective tissues will dissolve, leaving you a hunk of meat that falls off the bone and smells amazing.
Serve with mashed potatoes or a crusty bread.
Optional serving method: cook with potatoes, mushrooms, and any other root vegetable you like. Parsnips would be divine.
This could also be transferred into a slow cooker at step 6. Cook it on low for a mid-week meal that's waiting for you when you return from a long day at work.
Tuesday, October 12, 2010
Tomatillo salsa verde
Two years ago I was bitten by the canning bug. That summer I made my first batch of salsa verde and we loved it. For reasons I can't remember - probably due to a September wedding and honeymoon - no new jars were made last year.
When it came time this spring to plant our veggies, I insisted that tomatillos be among the selection. Indeed, I devoted about 1/6 of my total space to them, hoping for a bumper crop.
Summer 2010 had other plans for our heat-loving plantings. Out of some 8 plants, I got just 1 dishpan full of useable fruit. At least the fruit were unblemished, as earwigs and slugs don't seem to like them.
I had also planted 2 jalapenos for the umpteenth time, hoping that *this* was the year I'd get some peppers. I finally did get some but only after I had given up and bought some from sunnier eastern Washington. Now I was stuck with 35 jalapeno peppers and nothing to do with them.
Oh yeah... tomatillos + jalapenos = salsa verde!
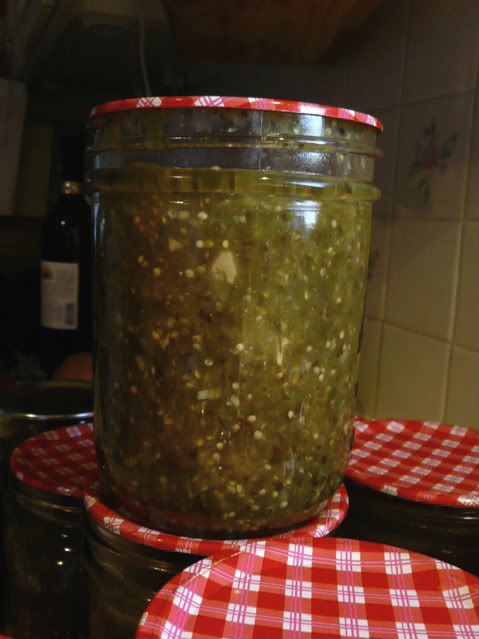
This is a quick and easy recipe. Pop open a bright green jar for Super Bowl, marinate some pork in it, or eat with your favorite enchilada recipe. It's one of my favorite things to make and can.
From the Ball Complete Book of Home Preserving
Tomatillo Salsa
Makes ~4 8-ounce jars
5.5 cups chopped, cored, husked tomatillos (food processer much faster than knife)
1 cup chopped onion
1 cup chopped, seeded jalapenos (remove membrane and seeds to reduce heat)
1/2 cup white vinegar
4 tbsp lime juice
4 cloves garlic
2 tbsp cumin
1/2 tsp salt (be conservative on the salt - tomatillos seem to get salty quickly)
1/2 hot pepper flakes (omit if using whole jalapenos)
1. Prepare canner, jars, and lids.
2. In a large, stainless steel saucepan, combine ingredients and bring to a boil over medium-high heat, stirring constantly. Reduce heat and boil gently 10 minutes.
3. If you prefer a smooth salsa, puree with a food processor or stick blender.
4. Put salsa into jars and leave 1/2 inch headspace.
5. Process 15 minutes once jars have come to a boil in a water bath canner.
There were enough tomatillos and jalapenos from my garden to make 11 pints and 3 half-pints of salsa verde. It's pretty dang spicy... and pretty dang good.

When it came time this spring to plant our veggies, I insisted that tomatillos be among the selection. Indeed, I devoted about 1/6 of my total space to them, hoping for a bumper crop.
Summer 2010 had other plans for our heat-loving plantings. Out of some 8 plants, I got just 1 dishpan full of useable fruit. At least the fruit were unblemished, as earwigs and slugs don't seem to like them.
I had also planted 2 jalapenos for the umpteenth time, hoping that *this* was the year I'd get some peppers. I finally did get some but only after I had given up and bought some from sunnier eastern Washington. Now I was stuck with 35 jalapeno peppers and nothing to do with them.
Oh yeah... tomatillos + jalapenos = salsa verde!
This is a quick and easy recipe. Pop open a bright green jar for Super Bowl, marinate some pork in it, or eat with your favorite enchilada recipe. It's one of my favorite things to make and can.
From the Ball Complete Book of Home Preserving
Tomatillo Salsa
Makes ~4 8-ounce jars
5.5 cups chopped, cored, husked tomatillos (food processer much faster than knife)
1 cup chopped onion
1 cup chopped, seeded jalapenos (remove membrane and seeds to reduce heat)
1/2 cup white vinegar
4 tbsp lime juice
4 cloves garlic
2 tbsp cumin
1/2 tsp salt (be conservative on the salt - tomatillos seem to get salty quickly)
1/2 hot pepper flakes (omit if using whole jalapenos)
1. Prepare canner, jars, and lids.
2. In a large, stainless steel saucepan, combine ingredients and bring to a boil over medium-high heat, stirring constantly. Reduce heat and boil gently 10 minutes.
3. If you prefer a smooth salsa, puree with a food processor or stick blender.
4. Put salsa into jars and leave 1/2 inch headspace.
5. Process 15 minutes once jars have come to a boil in a water bath canner.
There were enough tomatillos and jalapenos from my garden to make 11 pints and 3 half-pints of salsa verde. It's pretty dang spicy... and pretty dang good.
Monday, October 11, 2010
Sweet dreams
Way back when, when I was furnishing my first non-college apartment, I bought a mattress set. In fact, my roommate bought the same mattress set. I was single at the time and bought a queen size bed because, as I remember thinking, "I might be married someday." Haha... as if!
Wow. Twelve years passed. Since that fateful day when the mattresses were delivered 12 years ago this month, I have changed jobs 5 times (counting 2 promotions), earned my M.Ed, bought a house, and gotten married. And the mattresses gave up the ghost.
Hubbie and I threw a garage sale to raise the funds for a new mattress set. We're a cash-purchase-only household so it was critical that we had the money in hand before shopping. We're not a debt-free household, by (too) far, but we do what we can to avoid accumulating new debt.
As a Type A Virgo, anal-retentive internet research is both blessing and curse. Hubbie has sleep challenges and it was also important to find a bed that doesn't shake when a cat is licking its butt at 3:00 a.m. After a lot of searching we decided on a pocketed-coil mattress. We tried some by none blew up G-man's skirt.
My mom, after listening to me anguish about the decision, said, "You're always talking about going local. You need to stay with the local guys." Oh great, throw my own words and values back in my face, why doesn't she?
I eventually found a small, locally-owned chain that advertised minimally, and mostly on craigslist. They had a location nearby. We went. We laid down. We liked. We were unanimous!
But it wasn't a pocketed-coil mattress. It was an eco-friendly latex mattress with a soy foam base, organic bamboo and cotton cover. Since G-man builds electric cars, sleeping on a mattress that doesn't contain petroleum-derived products was pretty cool. Better yet, as much as either of us flopped around the other one couldn't feel much movement. And we certainly won't awake when a cat grooms itself in the wee hours.
It was a big, stressful purchase. We're both worried that it won't last or that we won't like it. I guess everyone goes through that, right?
The new mattress is being delivered on Tuesday evening. I can't wait. C'mon Tuesday!!
-- fast-forward 12 years --
Wow. Twelve years passed. Since that fateful day when the mattresses were delivered 12 years ago this month, I have changed jobs 5 times (counting 2 promotions), earned my M.Ed, bought a house, and gotten married. And the mattresses gave up the ghost.
Hubbie and I threw a garage sale to raise the funds for a new mattress set. We're a cash-purchase-only household so it was critical that we had the money in hand before shopping. We're not a debt-free household, by (too) far, but we do what we can to avoid accumulating new debt.
As a Type A Virgo, anal-retentive internet research is both blessing and curse. Hubbie has sleep challenges and it was also important to find a bed that doesn't shake when a cat is licking its butt at 3:00 a.m. After a lot of searching we decided on a pocketed-coil mattress. We tried some by none blew up G-man's skirt.
My mom, after listening to me anguish about the decision, said, "You're always talking about going local. You need to stay with the local guys." Oh great, throw my own words and values back in my face, why doesn't she?
I eventually found a small, locally-owned chain that advertised minimally, and mostly on craigslist. They had a location nearby. We went. We laid down. We liked. We were unanimous!
But it wasn't a pocketed-coil mattress. It was an eco-friendly latex mattress with a soy foam base, organic bamboo and cotton cover. Since G-man builds electric cars, sleeping on a mattress that doesn't contain petroleum-derived products was pretty cool. Better yet, as much as either of us flopped around the other one couldn't feel much movement. And we certainly won't awake when a cat grooms itself in the wee hours.
It was a big, stressful purchase. We're both worried that it won't last or that we won't like it. I guess everyone goes through that, right?
The new mattress is being delivered on Tuesday evening. I can't wait. C'mon Tuesday!!
Sunday, October 10, 2010
The girls next door
The other day I was putting away my recent batch of tomatillo salsa in the canning room.
(OK, "canning room" is a misnomer. It's a wall of shelves in what will be, eventually, a 1/4 bath. The teensy room also serves as the kitty litter box and animal food storehouse. I just realized we should call it "The Can" when it's all done... someday.)
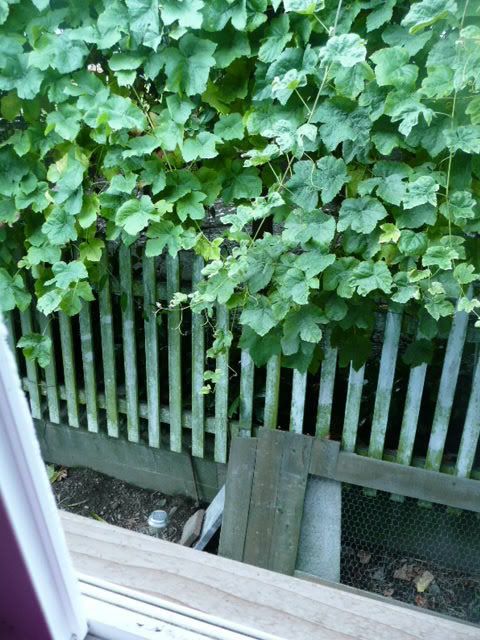
Anyway, this room has a small window that looks out over the chicken run and into the neighbors' back yard. Right now the grape leaves are very lush, giving us some privacy from each other.
It was a sunny day when I was putting away my jars and so the window was open. The chickens were cooing and making soft noises when suddenly I heard a man's voice:
"Bock bock bockbockbockbock BOCK!"
Croquette, our resident chatty Cathy, replied with her own version of whatever the guy had said.
They went back and forth for about a minute while I stood in The Can, chuckling to myself. I looked outside and could see a man in the neighbor's yard, his body obscured from the waist up by the grape arbor. He couldn't see me inside my house for the same reason. I didn't recognize his voice and am guessing he was a friend of the neighbor's 19-year-old son.
All 9 of our hens were standing at the fence, staring up at him. He probably thought it was because he was talking to them but in reality, they know that talking humans generally mean food.
I listened to him chat to them for a moment more, then I said loudly and clearly out the window, "I think it's really cute that you're talking to my chickens."
There was an awkward moment of pause while he digested the fact that I'd been eavesdropping on his "conversation" with my girls. He muttered something about the diversity of the hens as I retreated back into my house to finish up some chores. Even now, a few days later, I'm still laughing every time I think of this guy hitting on the girls next door.
Poor guy. I'm sure he was mortified.
But dang, that was funny.
(OK, "canning room" is a misnomer. It's a wall of shelves in what will be, eventually, a 1/4 bath. The teensy room also serves as the kitty litter box and animal food storehouse. I just realized we should call it "The Can" when it's all done... someday.)
Anyway, this room has a small window that looks out over the chicken run and into the neighbors' back yard. Right now the grape leaves are very lush, giving us some privacy from each other.
It was a sunny day when I was putting away my jars and so the window was open. The chickens were cooing and making soft noises when suddenly I heard a man's voice:
"Bock bock bockbockbockbock BOCK!"
Croquette, our resident chatty Cathy, replied with her own version of whatever the guy had said.
They went back and forth for about a minute while I stood in The Can, chuckling to myself. I looked outside and could see a man in the neighbor's yard, his body obscured from the waist up by the grape arbor. He couldn't see me inside my house for the same reason. I didn't recognize his voice and am guessing he was a friend of the neighbor's 19-year-old son.
All 9 of our hens were standing at the fence, staring up at him. He probably thought it was because he was talking to them but in reality, they know that talking humans generally mean food.
I listened to him chat to them for a moment more, then I said loudly and clearly out the window, "I think it's really cute that you're talking to my chickens."
There was an awkward moment of pause while he digested the fact that I'd been eavesdropping on his "conversation" with my girls. He muttered something about the diversity of the hens as I retreated back into my house to finish up some chores. Even now, a few days later, I'm still laughing every time I think of this guy hitting on the girls next door.
Poor guy. I'm sure he was mortified.
But dang, that was funny.
Wednesday, October 6, 2010
Pumpkin bread
Much to my chagrin, fall seems to have arrived. The signs are all in evidence: garden spiders are the size of marbles, 5 of our 9 hens are molting, my squash plants are succombing to dusty mildew, the heat is back on, and pumpkin-flavored things are back on the menu at Starbucks.
Since starting my new job, I've developed a terrible Starbucks habit. I recently gave up caffeine in hopeful anticipation that hubbie and I can start a family in the very near future. At about $4 for a double tall decaf non-fat no-whip mocha (what my boss calls a "Why Bother"), the habit has to stop. This morning I bought some Via, which I'll make at my desk. I'll put the $20 I'm saving each week into my meager savings account.
To be honest, I'm a good enough cook to make things that are way better - and way more varied - than Starbucks' pastry case could ever offer. This morning I was admiring the pumpkin bread, all the while chastising myself because I knew this recipe is so good.
If you like Starbucks' pumpkin bread, you'll love this recipe. I've been making it for years (sheesh, that makes me feel old to say things like that). Normally I don't like the combination of cinnamon and chocolate but this is one very good exception. As written below, it makes 3 loaves and uses a large can of pumpkin. The original recipe makes 2 loaves. The ingredients come together in just a few minutes and, with the exception of the pumpkin, are items found in most pantries.
Adapted ever-so-slightly from CookingLight.com
Chocolate Chip Pumpkin Bread
3 cups sugar
3 cups canned pumpkin (large can)
3/4 cup canola oil
2 6-ounce containers of plain or vanilla yogurt
3 large eggs
2 cups whole wheat flour
2 1/2 cups all-purpose flour
3 teaspoons ground cinnamon
2 teaspoons salt
2 teaspoons baking soda
1 1/2 cup semisweet chocolate chips
Optional: 1 cup nuts
Cooking spray
Preheat oven to 350°.
Combine first 5 ingredients in a very large bowl, stirring well with a whisk. Combine flour, cinnamon, salt, and baking soda in a medium bowl, stirring well with a whisk. Add flour mixture to pumpkin mixture, stirring just until moist. Stir in chocolate chips and optional nuts.
Spoon batter into 3 (8 x 4-inch) loaf pans coated with cooking spray. Bake at 350° for 1 hour and 15 minutes or until a wooden pick inserted in the center comes out clean. Cool 10 minutes in pans on a wire rack, and remove from pans. Cool completely on wire rack.
Options:
- Mini-loaf pans - fill 4 mini-loaf pans 1/2 full and bake for 45 minutes or until done
- Muffins - bake for 25 minutes
- Mini-muffins - bake for 15 minutes
- Bundt or circular pan - bake for 1 hour 15 minutes
Tuesday, October 5, 2010
Fun with Fermentation: Sauerkraut, Part II
After blogging for about 6 months now I've learned a lot. Sometimes I take too many pics and sometimes not enough. Be glad that there are no pics for this post.
Last night I made salsa verde (recipe & pics in a future post) and wanted to can the sauerkraut I've had on the counter for a while since the canning kettle was going. The kraut was done about a week ago so I'd left it on the counter with a basket on top, the baggie of brine still floating on the liquid's surface.
Mistake. Always put a lid back on anything that is fermented.
Always.
I lifted off the backet to discover that the sauerkraut was ruined. Two things had happened. First, there was mold. Most things that ferment will get a small amount of mold on any bits that float. The submerged bits will be fine.
Second, and most egregious, was that the fruit flies had had a sex orgy. That baggie of brine had become a waterbed for their fruit fly Boogie Nights! Be glad I didn't take any pics. There were pupae husks all over the baggie and on the sides of the pot. It was disgusting.
At least the fruit flies were happy... until I dumped them into the garbage disposal. What's weird is that I hadn't noticed many fruit flies in the kitchen, though I did hear the occasional strain of Marvin Gaye emmanating from the counter late at night.
Sigh. That'll teach me. I should have put an impermeable lid or cover on it. I should have canned it 2 weeks ago. I should have put it into the fridge.
Thank goodness cabbage is cheap. Had I lost my pickles I would have cried.
Saturday, October 2, 2010
Canning page updated
This week I had a disheartening conversation with someone who is new to canning. She had recently made pickles and off-handedly mentioned something about doing them in the oven. She also said that she hadn't bothered to sanitize her jars.
Ruh roh. That's not good. Oven-canning and not sanitizing are both no-nos.
I asked her why she did it that way and she said something that the CSA people said that's what other people had been doing. GAH! I could just scream.
Disseminating such bad information is irresponsible. What if her family, or another family who followed the same directions, got sick? Botulism, while rare, is still a very real thing. It is also avoidable. If the people manning the booth don't know, they should just say so. There's plenty of information available online about canning.
So I sent her a link to my page about canning. While I don't want to discourage her from canning, I do want to make sure that she has access to correct canning information to ensure her family's safety. I also offered to contact the CSA people who gave her the bad directions to correct them and point them to safe canning procedures.
Before sending her the link I decided to update the canning section of my blog. I've centralized the links for safe-canning resources and added information on where to get canning equipment.
Get to know the NCHFP guidelines for safe preservation methods so that you can spot problems in recipes posted online. I recently read a blog post about home canning tomato soup (I won't link to it from here). It looked great and I'm sure the soup is wonderful. But when I read through the ingredients and method I realized it's not a safe recipe for any canning method. The blogger writes:
People who decide to continue with unsafe methods may do so at their own risk. They should not promote those methods, nor should they share their jars with others. Suffice it to say, I won't be canning the above tomato soup recipe as written nor would I accept a jar were she to offer me one.
Yes, I'm on a safety soapbox but my blog is my pulpit.
fin.
Ruh roh. That's not good. Oven-canning and not sanitizing are both no-nos.
I asked her why she did it that way and she said something that the CSA people said that's what other people had been doing. GAH! I could just scream.
Disseminating such bad information is irresponsible. What if her family, or another family who followed the same directions, got sick? Botulism, while rare, is still a very real thing. It is also avoidable. If the people manning the booth don't know, they should just say so. There's plenty of information available online about canning.
So I sent her a link to my page about canning. While I don't want to discourage her from canning, I do want to make sure that she has access to correct canning information to ensure her family's safety. I also offered to contact the CSA people who gave her the bad directions to correct them and point them to safe canning procedures.
Before sending her the link I decided to update the canning section of my blog. I've centralized the links for safe-canning resources and added information on where to get canning equipment.
Get to know the NCHFP guidelines for safe preservation methods so that you can spot problems in recipes posted online. I recently read a blog post about home canning tomato soup (I won't link to it from here). It looked great and I'm sure the soup is wonderful. But when I read through the ingredients and method I realized it's not a safe recipe for any canning method. The blogger writes:
Some people say this isn’t long enough in a canner, some people say you should only pressure can this recipe. I’m happy with it and am quite comfortable making it and processing it in this way. If you’re uncomfortable with this method use whatever canning method you’re comfortable with.This disclaimer doesn't acknowledge the right thing: the recipe contains ingredients that are not approved for safe canning.
People who decide to continue with unsafe methods may do so at their own risk. They should not promote those methods, nor should they share their jars with others. Suffice it to say, I won't be canning the above tomato soup recipe as written nor would I accept a jar were she to offer me one.
Yes, I'm on a safety soapbox but my blog is my pulpit.
fin.
Subscribe to:
Posts (Atom)